Create the perfect checklist: How you create a checklist in three steps
The checklist in production helps to carry out various processes. It supports workers in the maintenance of machines, in the review of quality targets and in the incoming goods inspection. Read more on how to optimize your checklist creation.

What it's about
In this blog article, you will learn how to create the optimal checklist in just three steps and how checklist software can help you.
How to create the optimal checklist in 3 Steps
Whether as a checklist with important criteria or as a to-do list to check off - in manufacturing there are the most diverse types of checklists. Important questions that arise in connection with the creation of checklists are:
What does the ideal checklist look like?
What important information should a checklist contain?
Are there suitable checklist templates?
Should one rely on online checklists?
How do I create such a checklist step by step?
How do I create a checklist that not only helps workers perform inspection processes easily, but also provides valuable information for improving processes?
If you are working on taking your maintenance, assembly or quality inspection documentation to the next level, you have probably asked yourself these or similar questions. After all, process flows of manufacturing companies are based on comprehensible and standardized process documentation.
In the following, we will explain to you step by step how to create a checklist that contains all the important information and can be optimally used in everyday work.
Step 1: Define information requirements
Depending on the area of application, you will need different information. You should keep that in mind when creating a checklist. If the checklist is used in the maintenance and inspection of a machine, it is worth asking for measured values and sensor data.
If you use the checklist to control the incoming goods, the employee carrying out the inspection should be able to enter values such as number or weight and confirm the integrity of the goods on the basis of check points. If unforeseen incidents occure, pictures or videos taken on site can be helpful.
When creating the checklist, consider the following points:
Define information needs
Select a suitable presentation method
Make checklists self-explanatory and intuitively understandable for employees
Use simple and clear language
Use pictures to explain activities and bridge language barriers
Identify necessary and optional process steps in an understandable way
With the help of a checklist app, this step can be done much easier than with Excel or Word templates. A software solution allows a very visual representation of your processes through images and videos. Images can even be supplemented with arrows, drawings and labels – leaving employees no room for interpretation of the process steps.
Checklist software gives you a range of different interaction options:
i.O./n.i.O checks for simple status queries (for visual inspections)
Check points to confirm that an activity has been performed
Multiple-choice answer options
Comment fields (e.g. as a supplement to n.i.O.)
Sensor data – directly from the machine to the checklist
Target/performance comparison for checking tolerances
Image feedbacks and the possibility to add arrows or other markings
Video feedbacks for objects in motion (e.g. imbalance)
Values, e.g. number, weight and temperature, incl. related unit
Signature fields to acknowledge activities
Using the example of a quality inspection with the Connected Worker software solution from Operations1, this can then look like this:
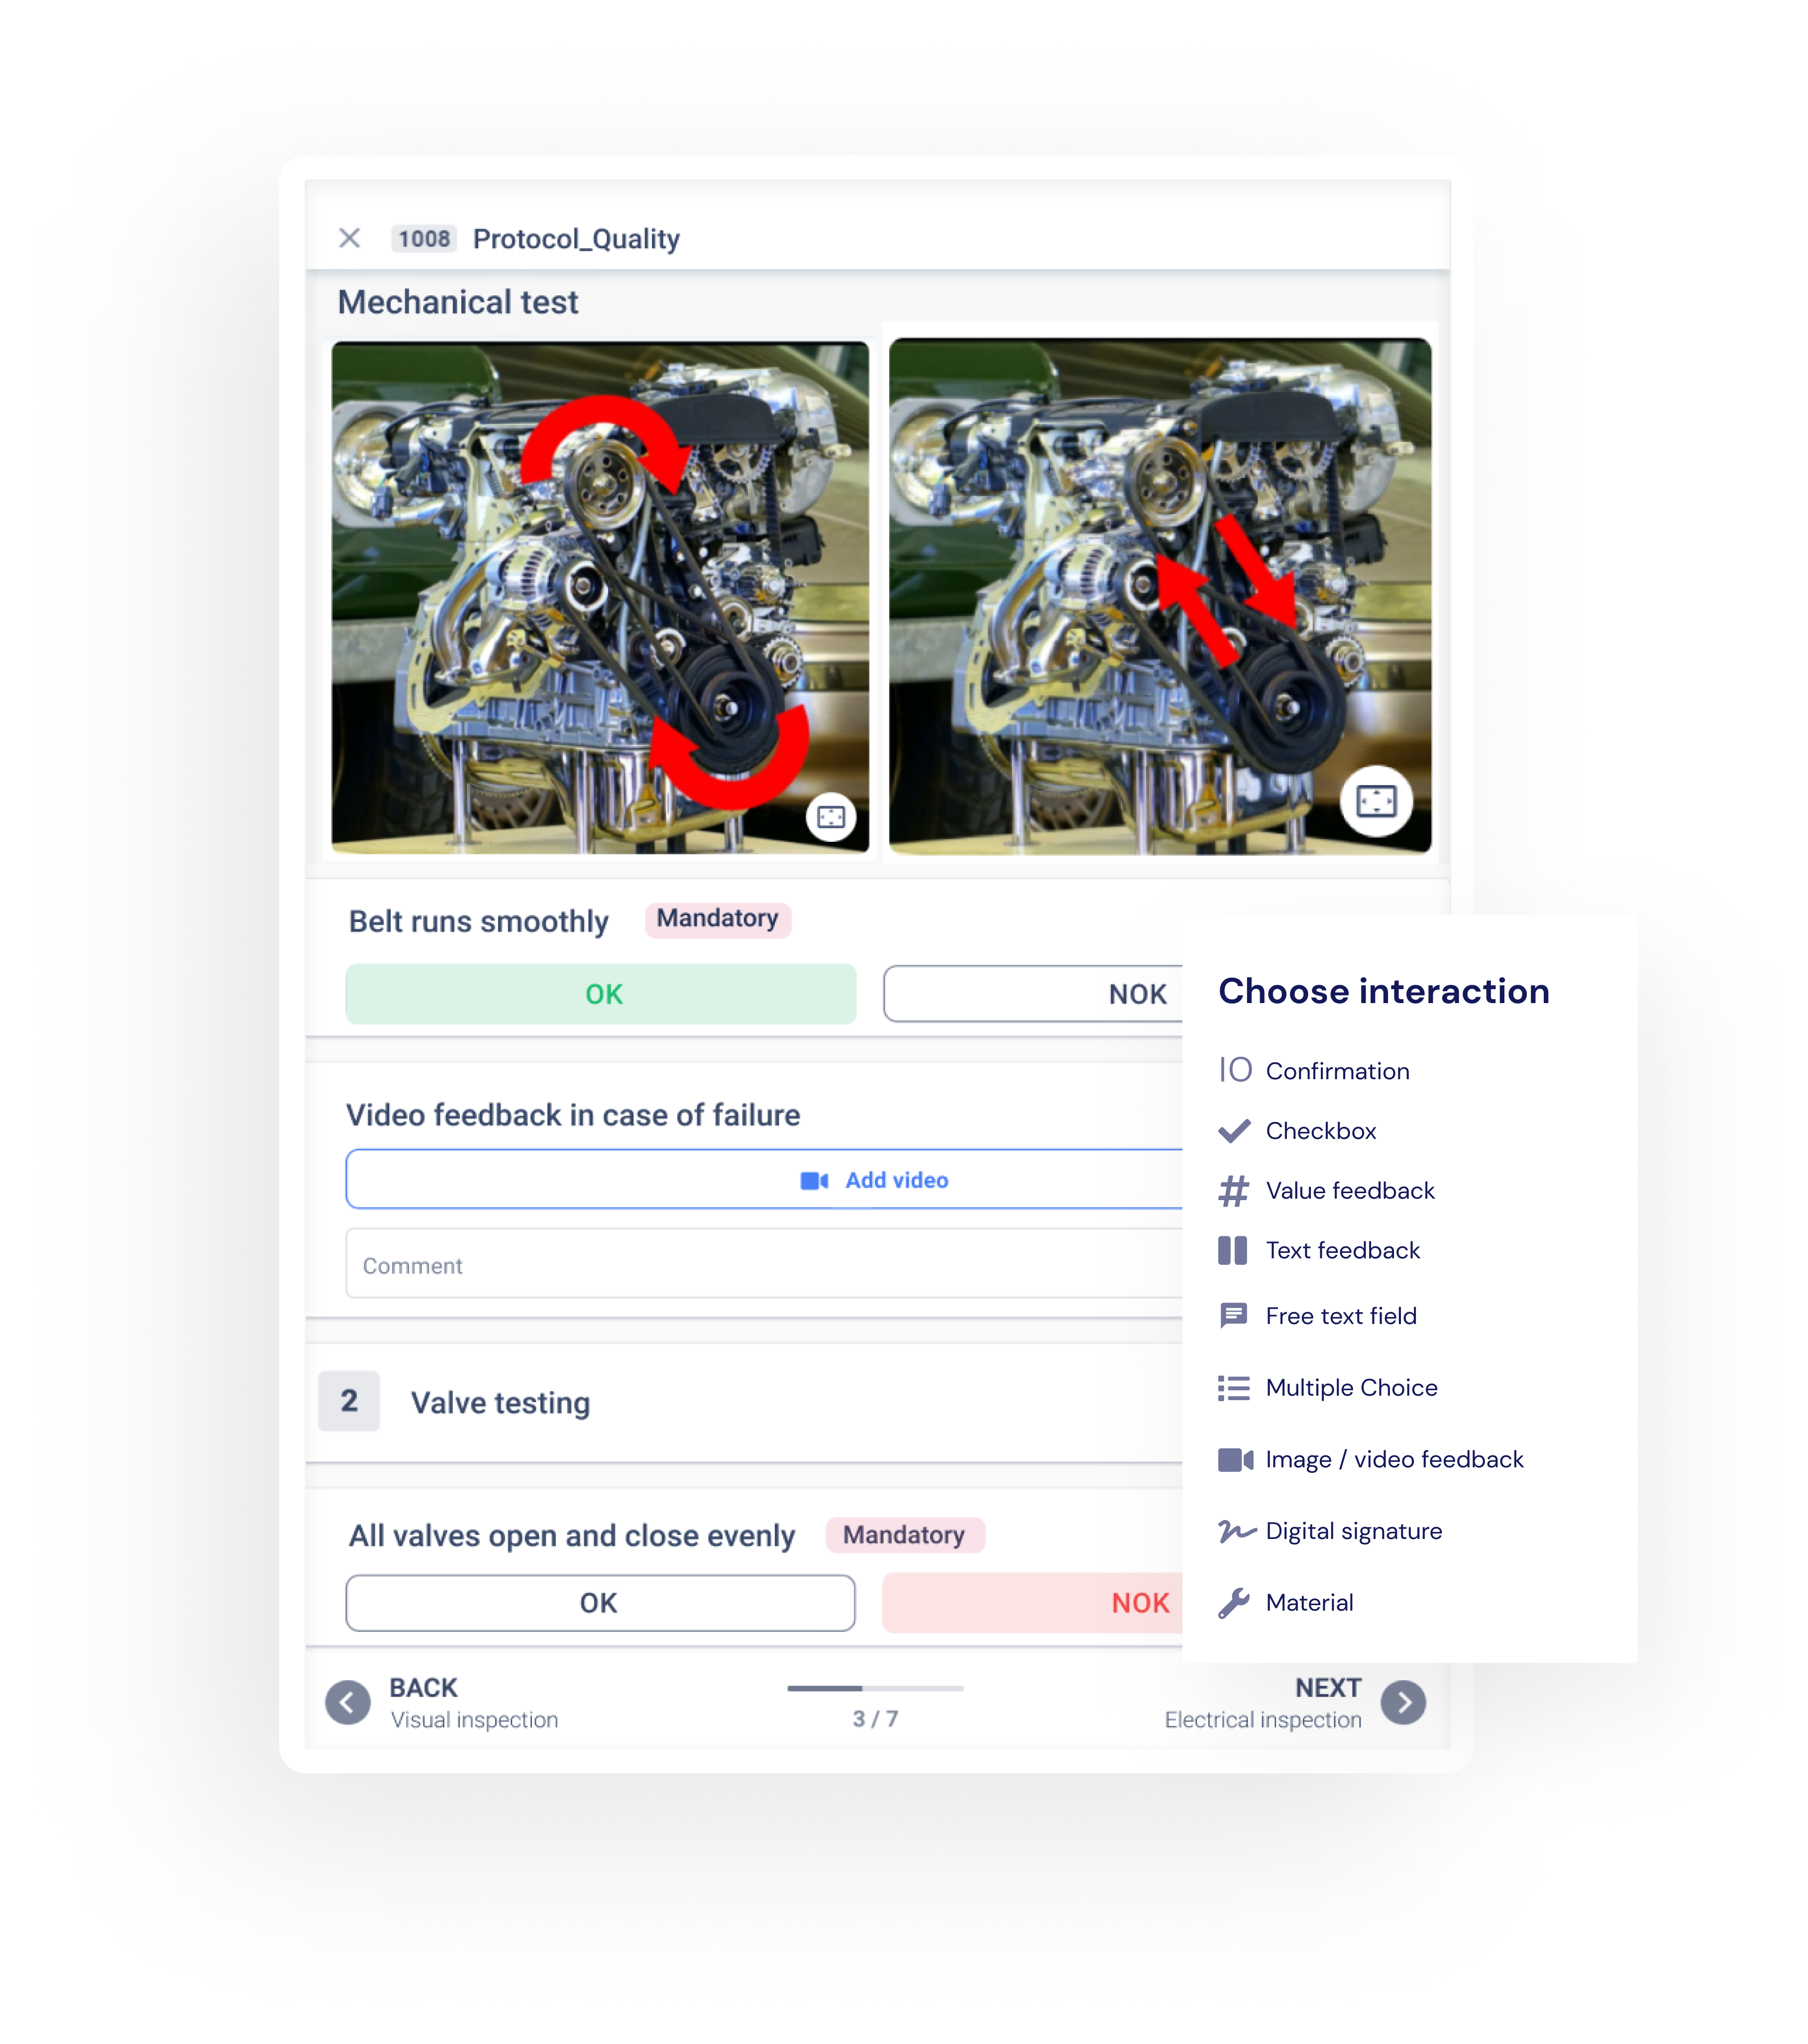
Depending on the information you need, you can simply select the appropriate interaction and drag and drop it into the digital checklist. This saves you enormous effort in creating checklists. Another advantage of the checklist software: checklists can be translated into multiple languages. This means that all employees always understand what needs to be done - regardless of their location.
Step 2: Use findings and statistics for CIP
Systematically evaluate findings from checklists and create the basis for a continuous improvement process. If you have implemented the first step, you already have the right data. Now you just have to use this information: Find the causes of the errors your workers have documented and start looking for solutions.
But don’t just look at individual findings, look at the big picture using statistics. Which process step has a particularly high error rate? Where do unforeseen incidents often occur? Perhaps machine values are not within the tolerance range over a longer period of time or during a specific time period.
You should monitor this data to identify patterns and figure out the causes. Perhaps your employees have recorded on-site-incidents in pictures. Periodically take a look at these photos and analyze them. If you use software to create your checklist, the mentioned information and data is available to you in real time and you can respond immediately.
For example you can …
discuss photos and videos in weekly quality stand-up meetings.
measure time series of specific quality parameters and keep an eye on improvement.
compare statistics about locations, shifts, teams, machines or products.
calculate reference values such as cost of poor quality to increase meaningfulness.

In order to continuously improve, checklists also need to be developed further. Workers may have commented on the comprehensibility of the sub-steps of the process using text fields. This can help you to improve and further develop the checklists. You can change Process steps or ad new content with only a few clicks. Your employees will then receive a notification about the changes when they open the checklist. In this way, you optimize step by step and your workers always perform their work according to the current process standard.
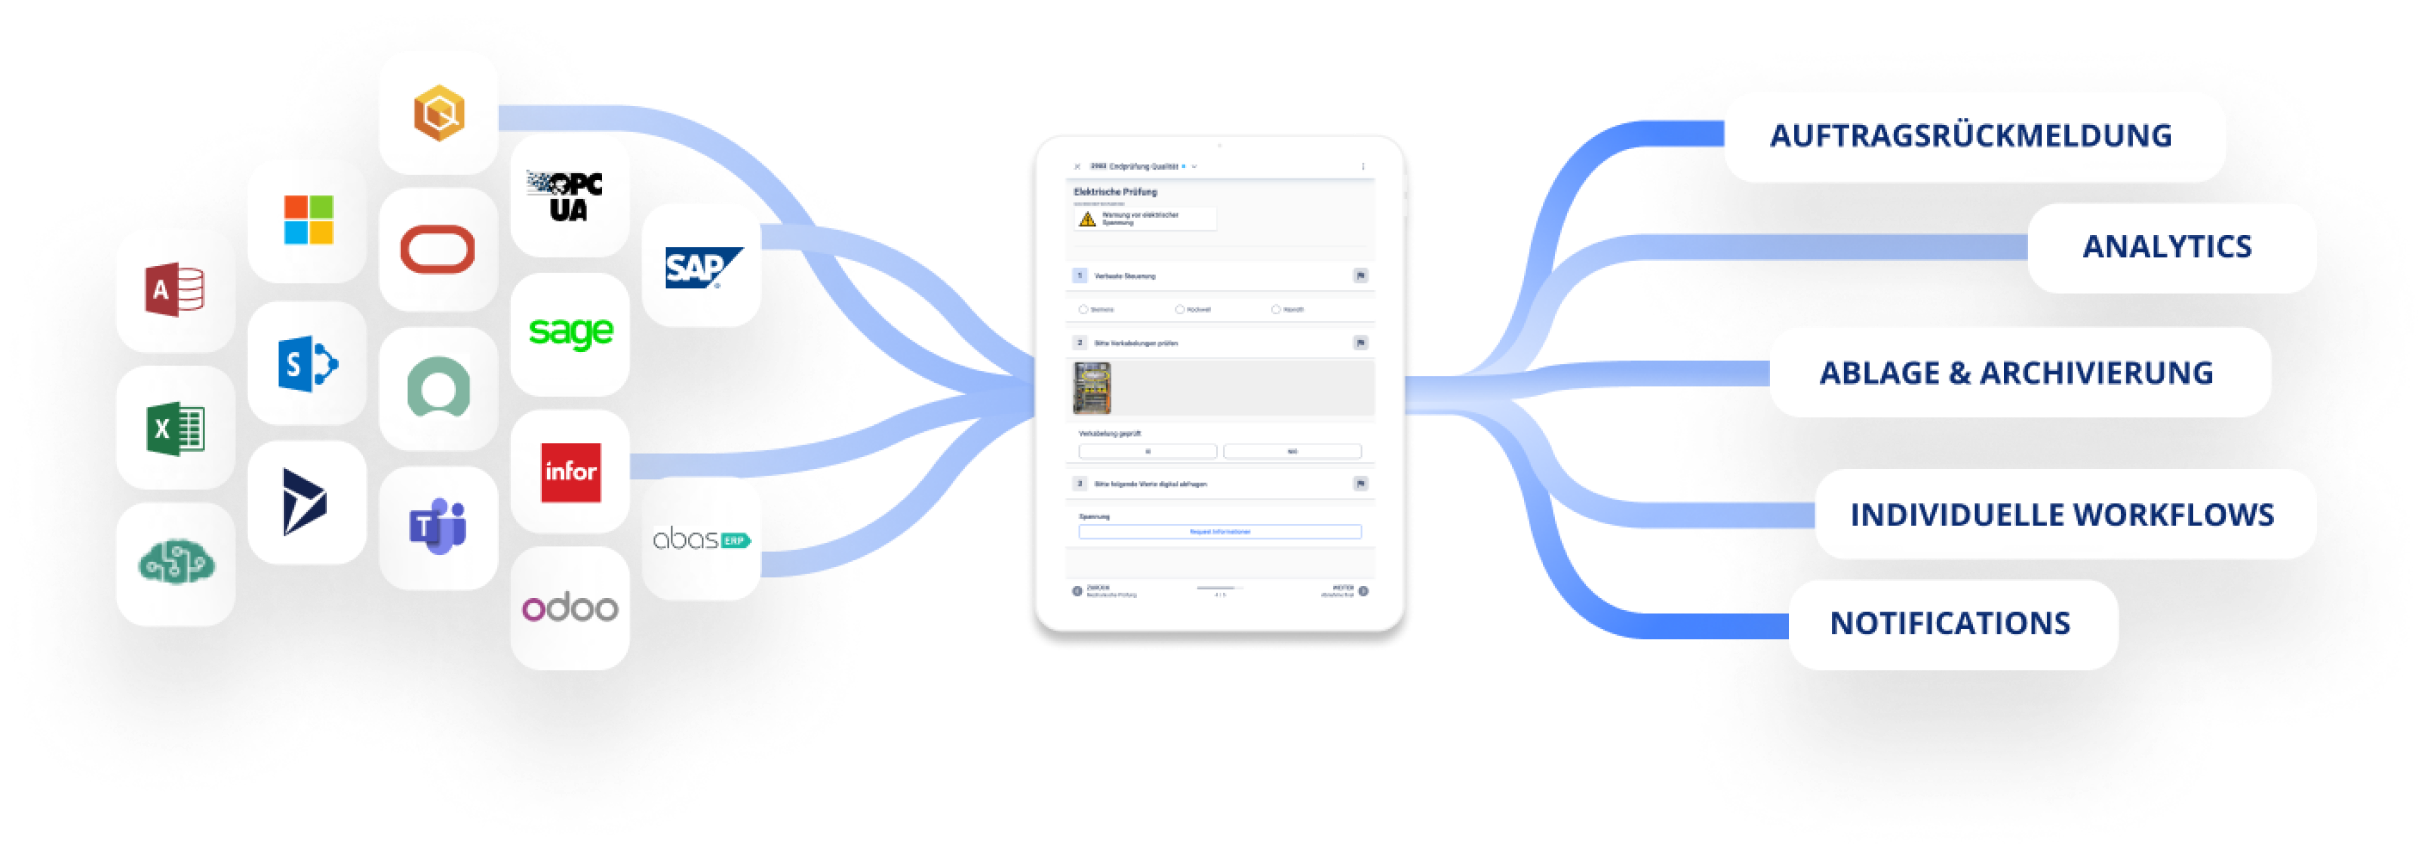
Step 3: Integrate your checklist software with your adjacent systems
Before workers can start a process, they often begin by searching for all the relevant information: What is the assignment? Where are the right checklists? Checklist software helps here, too, because it can be fully integrated with other systems.
Your advantages:
Orders are directly linked to the relevant checklist. Operational staff no longer have to dig through filing cabinets and folders to find the right checklist.
Once the checklist is completed, the employee does not have to deal with time-consuming data transfer and filing. The checklist software immediately transfers the information to systems such as Power BI, and the information is ready for analysis.
This saves time and shopfloor employees can fully concentrate on their core activities. On top of that, you eliminate errors that can occur when data is transferred manually.
In third-party systems, you can also decide which checklist data is particularly relevant to you and create a customized dashboard. Integration with ERP systems allows you to automatically confirm orders, file reports and start follow-up processes.
Conclusion
As you can see, it’s not difficult to create a checklist that makes it easier for your workers to carry out processes, thereby increasing process understanding and reducing the errors.
A checklist app provides the necessary design and interaction options to easily and quickly build the optimal checklist. In addition, by using a checklist software, you have a powerful tool at hand to systematically evaluate and continuously improve your checklists.
You want to learn more about digital checklists? Then download our e-paper Checklist 4.0.
Checklist 4.0
With digital checklists, you increase efficiency and make better decisions. Read in our whitepaper how our software solution can help you!
Get to know the software in just 3 minutes
Discover the functions of Operations1 in an interactive product tour and get to know our platform.


Editha Bertsch
Editha is an experienced project management expert for manufacturing companies. With a clear understanding of the specific challenges of the industry, she is passionate about developing innovative solutions.
Related articles

The importance of high-quality work instructions is constantly increasing. In times of a shortage of skilled workers, small batch sizes and varied productions, a precise work instruction is the gold of the 21st century. Find out here how to create a professional work instruction and what you have to pay attention to.
Oct 18, 2021

Buzzwords like Industry 4.0 or Smart Factory are on everyone's lips. Most manufacturing companies are already investing heavily in digitization. However, this often creates data silos and increases complexity for operational employees.
Adaptive Process Execution Software helps to think holistically about the production process, to focus on the operational employee and to network the organization.
Oct 26, 2021

Offering customers a wide range of variants will not be a differentiating feature in perspective, but a standard that must also be taken into account operationally in assembly processes, testing processes and other workflows. As the number of variants increases, a suitable data structure becomes more and more important.
Oct 25, 2021